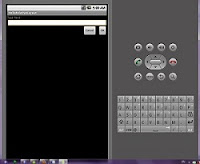
Tutorial kali ini kita akan belajar membuat Relative Layout. Relative layout adalah sebuah layout dimana posisi dari sebuah komponen (simbol, text,dsb) bisa diatur letaknya terhadap komponen lainnya. Misalnya tombol “OK” posisinya berada dibawah “Edit Text”, kemudian tombol “cancel” posisinya berada di sebelah kiri tombol “OK” dan dibawah “edit Text”. Intinya, saling berkaitan satu dengan yang lain. Perhatikan gambar

Sebelum bermain memulai koding, saya sarankan untuk membaca TUTORIAL sebelumnya yaitu TUTORIAL 3- Linier Layout karena memahami materi pada tutorial sebelumnya akan sangat membantu dalalam memahami tutorial selanjutnya. Setelah itu ikuti langkah-langkah berikut:
1. Jalankan Enclipse, File > New > Android Project
2. Isikan kotak dialog new seperti berikut
3. Pada Package Explorer, pilih RelativeLayout > res > layout > main.xml.
4. Gantilah dengan kode dibawah ini
<?xml version="1.0" encoding="utf-8"?>
<RelativeLayout
xmlns:android="http://schemas.android.com/apk/res/android"
android:layout_width="fill_parent"
android:layout_height="fill_parent"
android:gravity="top">
<TextView
android:id="@+id/label"
android:layout_width="fill_parent"
android:layout_height="wrap_content"
android:text="Type here:"/>
<EditText
android:id="@+id/entry"
android:layout_width="fill_parent"
android:layout_height="wrap_content"
android:background="@android:drawable/editbox_background"
android:layout_below="@id/label"/>
<Button
android:id="@+id/ok"
android:layout_width="wrap_content"
android:layout_height="wrap_content"
android:layout_below="@id/entry" android:layout_alignParentRight="true" android:layout_marginLeft="10dip" android:text="OK" />
<Button
android:layout_alignTop="@id/ok"
android:text="Cancel"
android:layout_height="wrap_content"
android:layout_width="wrap_content"
android:layout_toLeftOf="@+id/ok" android:layout_below="@+id/entry"/>
</RelativeLayout>
5. Pastikan pada RelativeLayout.java seperti dibawah ini.
package relativeLayout.source;
import android.app.Activity; import android.os.Bundle;
public class RelativeLayout extends Activity {
/** Called when the activity is first created. */
@Override
public void onCreate(Bundle savedInstanceState) { super.onCreate(savedInstanceState); setContentView(R.layout.main);
}
}
6. Lakukan Run dengan shortcut CTRL+F11 atau klik kanan package > run as > android Project.
7. Lihat hasilnya
Download artikel selengkapnya DISINI (DOWNLOAD)
Sumber : Modul omayib.com

Sebelum bermain memulai koding, saya sarankan untuk membaca TUTORIAL sebelumnya yaitu TUTORIAL 3- Linier Layout karena memahami materi pada tutorial sebelumnya akan sangat membantu dalalam memahami tutorial selanjutnya. Setelah itu ikuti langkah-langkah berikut:
1. Jalankan Enclipse, File > New > Android Project
2. Isikan kotak dialog new seperti berikut
Project name
|
RelativeLayout
|
Contents
|
Create new project in workspace
|
Build Target
|
Android 2.1
|
Application name
|
HelloRelativeLayout
|
Package name
|
relativeLayout.source
|
Create Activity
|
RelativeLayout
|
Min SDK version
|
3. Pada Package Explorer, pilih RelativeLayout > res > layout > main.xml.
4. Gantilah dengan kode dibawah ini
<?xml version="1.0" encoding="utf-8"?>
<RelativeLayout
xmlns:android="http://schemas.android.com/apk/res/android"
android:layout_width="fill_parent"
android:layout_height="fill_parent"
android:gravity="top">
<TextView
android:id="@+id/label"
android:layout_width="fill_parent"
android:layout_height="wrap_content"
android:text="Type here:"/>
<EditText
android:id="@+id/entry"
android:layout_width="fill_parent"
android:layout_height="wrap_content"
android:background="@android:drawable/editbox_background"
android:layout_below="@id/label"/>
<Button
android:id="@+id/ok"
android:layout_width="wrap_content"
android:layout_height="wrap_content"
android:layout_below="@id/entry" android:layout_alignParentRight="true" android:layout_marginLeft="10dip" android:text="OK" />
<Button
android:layout_alignTop="@id/ok"
android:text="Cancel"
android:layout_height="wrap_content"
android:layout_width="wrap_content"
android:layout_toLeftOf="@+id/ok" android:layout_below="@+id/entry"/>
</RelativeLayout>
5. Pastikan pada RelativeLayout.java seperti dibawah ini.
package relativeLayout.source;
import android.app.Activity; import android.os.Bundle;
public class RelativeLayout extends Activity {
/** Called when the activity is first created. */
@Override
public void onCreate(Bundle savedInstanceState) { super.onCreate(savedInstanceState); setContentView(R.layout.main);
}
}
6. Lakukan Run dengan shortcut CTRL+F11 atau klik kanan package > run as > android Project.
7. Lihat hasilnya
Download artikel selengkapnya DISINI (DOWNLOAD)
Sumber : Modul omayib.com
